Starting your own eCommerce online store may appear difficult, but with WordPress, it is easier than you think. In this guide, we’ll walk you through the steps of creating an eCommerce website with WordPress. By the end, you will have a fully operational wordpress ecommerce store that can accept orders.
Why Should You Use WordPress for Your E-Commerce Store?
Before we begin, let’s talk about why WordPress is an excellent platform for building an eCommerce store:
WordPress is simple to use, even for beginners.Creating a professional-looking website does not require coding skills.
Flexible: With thousands of themes and plugins available, you can customize the appearance and functionality of your store.
While it is important to consider your budget when thinking of hiring a web development company, focusing solely on price can be a costly mistake in the long run. Although they can have enticing prices, cheap website development companies in Dubai might not be able to do the kind of work or level of service that your company requires. Note that your website is an investment in your company’s expansion rather than an investment in its future, therefore it makes sense to spend money with a respectable web development company that can provide a high-caliber result.
Affordable: WordPress is free, and you can save money by using low-cost hosting and plugins.
Large Community: There is a large WordPress community, so if you get stuck, you can find plenty of support, tutorials, and resources.
Getting Started: What You Need
To start your eCommerce store, you’ll need a few things:
Domain Name: This is your store’s address on the web, like www.yourstore.com.
Web Hosting: This is where your website lives online. Hosting companies store your website’s files and make them accessible to visitors.
WordPress: The platform you’ll use to build your site.
eCommerce Plugin: A tool that adds shopping features to your WordPress site. WooCommerce is the most popular option.
Step 1: Choose a domain name and hosting plan
Your domain name is important because it is the first thing customers notice. Select a memorable name that accurately reflects your brand. Once you’ve decided on a domain name, you’ll need to register it and set up web hosting.
Registering Your Domain: You can register your domain with a domain registrar such as GoDaddy or Namecheap.

Choosing A Hosting Provider: Select a WordPress-specific hosting provider like Bluehost, SiteGround, or HostGator. These providers make it simple to install WordPress and begin creating your website.
Step 2: How to Install WordPress
We will guide in this blog how to install wordpress to create a eCommerce Store with the help of WooCommerce. Most hosting companies offer one-click WordPress installation. Once you’ve signed up for hosting, your dashboard will include a WordPress installation option. Follow the prompts to get your WordPress site up and running in minutes
Step 3: Select a WordPress theme
Your theme determines how your website looks. WordPress offers thousands of free and premium themes. When selecting a theme for your eCommerce store, consider the following.

Design: Choose a clean, modern look that complements your brand.
Mobile-responsive: Ensure that the theme looks good on mobile devices, as many shoppers browse on their phones.
Compatible with WooCommerce: If you intend to use WooCommerce, make sure your theme supports it.
To install a theme, go to your WordPress dashboard, select “Appearance,” and then “Themes.” You can search for themes, preview them, and then install the ones you like.
Step 4: Install and set up WooCommerce.
WooCommerce is a powerful WordPress plugin that converts your site into a fully operational eCommerce store. It’s free and easy to set up.

Install WooCommerce: In your WordPress dashboard, go to “Plugins” and click “Add New.” Search for WooCommerce and click “Install Now,” then “Activate.”
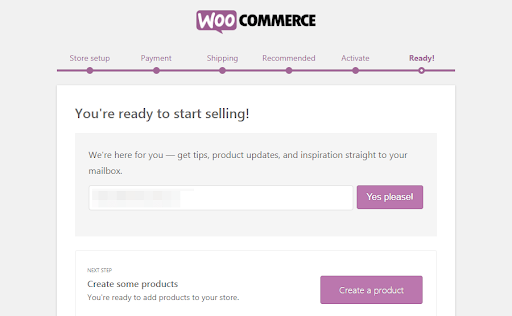
Set Up WooCommerce: Once you’ve activated WooCommerce, you’ll be taken through the setup wizard. You will enter important store information here, such as currency, payment methods, and shipping options.

Step 5: Add Your Products
Now that WooCommerce is set up, you can start adding products to your store. Here’s how:

Go to Products: In your WordPress dashboard, click on “Products” and then “Add New.”
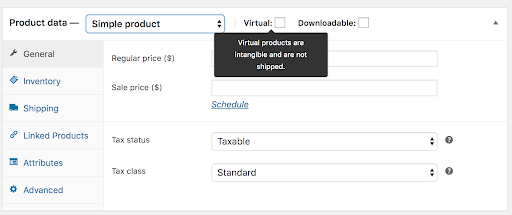
Enter Product Details: Add the product name, description, price, and images. You can also organize your products into categories, like “Shirts,” “Shoes,” or “Accessories.”

Set Inventory: If you have limited stock, WooCommerce allows you to manage inventory levels. You can set the quantity of each product and receive notifications when stock is low.
Step 6: Set Up Payment Gateways
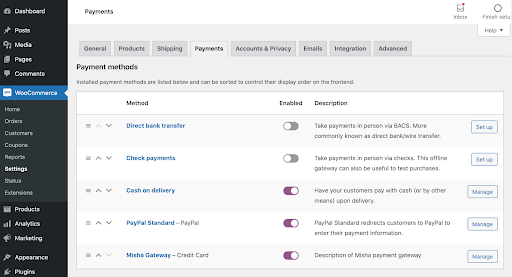
A payment gateway is a service that processes payments for your online store. WooCommerce supports many payment options, including PayPal, Stripe, and credit card payments.

Choose a Payment Gateway: In your WooCommerce settings, go to “Payments” and select the payment methods you want to accept.
Set Up Payment Gateway: For each payment method, you’ll need to enter your account details to link it to your store. Follow the instructions provided by WooCommerce to complete the setup.
Step 7: Configure Shipping Options
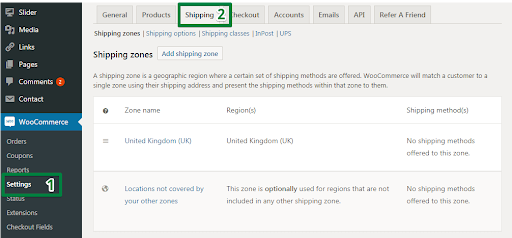
If you plan to ship physical products, you need to set up shipping options. WooCommerce offers flexible shipping settings:

Shipping Zones: Set different shipping rates based on the location of your customers. For example, you can offer free shipping within your country and charge a fee for international orders.
Shipping Methods: Choose how you’ll ship your products. You can offer flat rate shipping, free shipping, or calculate shipping costs based on the weight and size of the products.
Shipping Classes: If you sell items of different sizes, you can create shipping classes to group products and set specific rates for each class.
Step 8: Customize Your Store’s Appearance
To make your store look unique, you can customize the appearance of your WordPress site:
Menus: Organize your site’s navigation by creating menus. Go to “Appearance” > “Menus” to set up links to important pages like “Shop,” “Cart,” “Checkout,” and “Contact Us.”
Widgets: Add extra features to your site’s sidebar or footer, like a search bar, product categories, or social media links. You can manage widgets in the “Appearance” > “Widgets” section.
Colors and Fonts: Most themes allow you to customize the colors and fonts of your site to match your brand. You can find these settings in the “Appearance” > “Customize” section.
Step 8: Customize Your Store’s Appearance
Before launching your store, it’s important to test everything to make sure it works correctly:
Place Test Orders: Go through the checkout process to ensure customers can easily buy products. Check that payment and shipping options work as expected.
Step 8: Customize Your Store’s Appearance
Once you’re confident that everything is properly set up, it’s time to launch your eCommerce store:
Announce Your Launch: Spread the word on social media, email your subscribers, and consider offering a promotion or discount to entice your first customers.
Monitor Your Site: After you’ve launched, keep an eye on how your site is performing. Check for any problems and be ready to make changes based on customer feedback.
Bonus Tips: Promoting Your eCommerce Store
After your store is live, you’ll need to promote it to attract customers. Here are some simple ways to market your eCommerce store:
Search Engine Optimization (SEO): Optimize your site’s content for search engines to improve your visibility in Google search results. Use keywords related to your products and write detailed product descriptions.
Social media marketing: SMM involves promoting your products on platforms such as Facebook, Instagram, and Pinterest. Consider paid advertising to reach a wider audience.
Email Marketing: Build an email list and send subscribers regular updates on new products, promotions, and special offers.
Content Marketing: Start a blog on your website to share tips, tutorials, and other useful content related to your products. This can help drive traffic to your store and improve your SEO.
Launching an eCommerce store with WordPress is a straightforward process that doesn’t require technical expertise. By following these steps, you can create a professional eCommerce online store and start selling your products to customers around the world. Remember, success doesn’t
happen overnight, so be patient and keep working on improving your store as you learn more about what your customers need.
Working With a WordPress Development Company in Dubai
If you want to take your eCommerce store to the next level, working with a professional WordPress Development Company in Dubai. They can help you customise your website, improve its performance, and make sure your store is search engine optimised. Whether you need assistance with design, functionality, or SEO, collaborating with experts can significantly improve the success of your online store.

